Hardening Windows Installations - Security Baselines - Part 5
As a note, between the end of Security Baselines - Hardening Windows Installations - Part 4 and the Video Catch-Up series a mistake was introduced into the process that may cause some confusion. Originally, the documented path was C:\Windows\LTSvc\Blog, while the video changed to C:\Windows\LTSvc\PISB, with the PISB folder being a mistake. Moving forward, this process will document using the C:\Windows\LTSvc\Blog directory in the blogs and videos. If anything else is observed, the implementer must note what is actually implemented versus what is actually downloaded.
The final step on Part 4 left with the compressed Windows 11 v23H2 Security Baseline.zip uploaded to the WebDAV folder. As shown in the Video Catch-Up series, the steps applied and ran correctly, displaying orchestration in regards to downloading from a remote site to the Windows client.
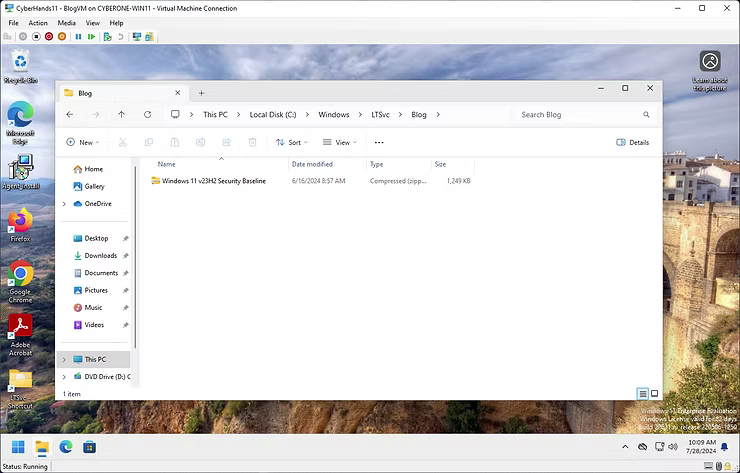
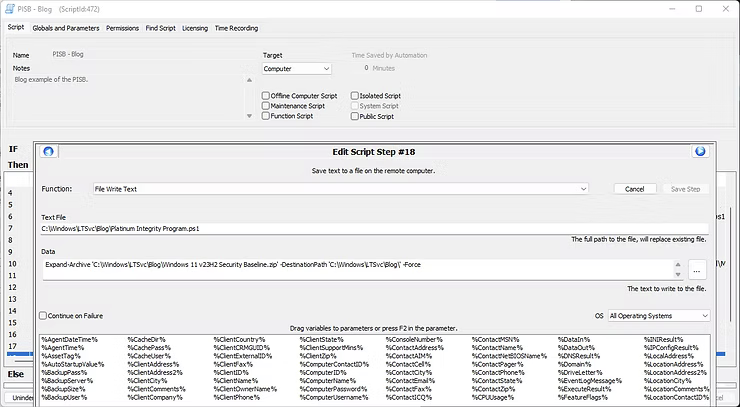
With the Windows 11 v23H2 Security Baseline.zip downloaded to the remote client, the compressed file needs to be decompressed to achieve the desired effect to call and apply the specific scripts. To accomplish this, a new script step with the function File Write Text to the Text File path of C:\Windows\LTSvc\Blog\Platinum Integrity Program.ps1 with the data field of Expand-Archive 'C:\Windows\LTSvc\Blog\Windows 11 v23H2 Security Baseline.zip' -DestinationPath 'C:\Windows\LTSvc\Blog' -Force will be needed to decompress the actual file.
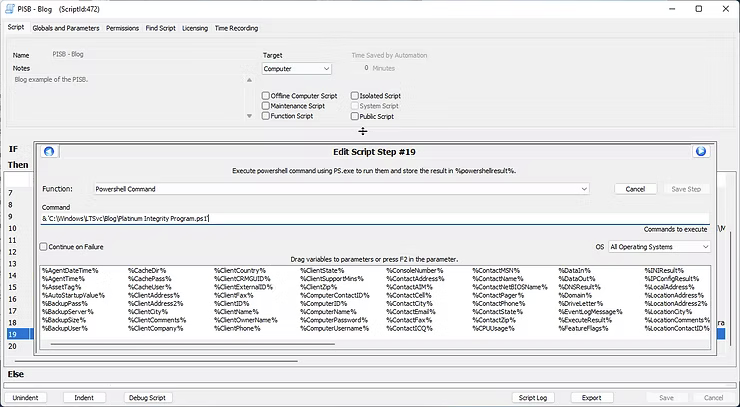
To call the file, the next script block will contain a function of Powershell Command with the actual command data being & 'C:\Windows\LTSvc\Blog\Platinum Integrity Program.ps1' to execute the script.
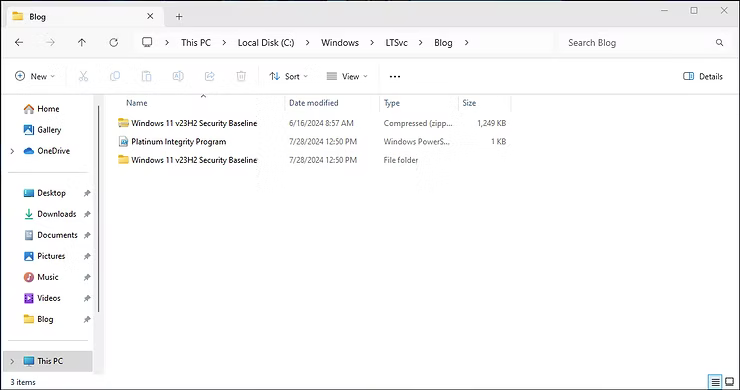
At this point in the process, if an implementer was to apply the current script as a test, the decompressed folder will highlight the achieved progress.
With the data staged, its finally time to start moving into the core steps of establishing and applying the Microsoft Security Compliance Toolkit. As a reminder, the purpose of this writing is primarily to establish a Windows Security Baseline, but written for inexperienced Information Technology professionals. The following Powershell function, while able to be written different ways to show methodologies, will be approached from a simplified perspective for those new to script writing to help enable troubleshooting from a shell.
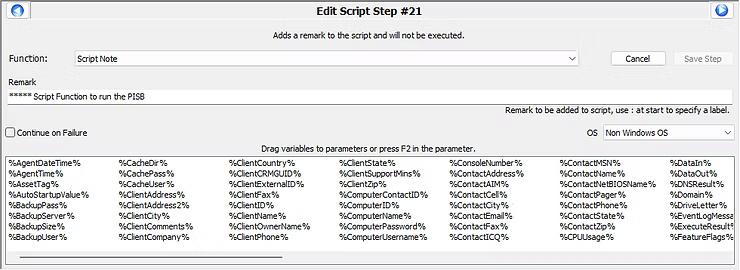
Add a new script function of Script Note with a remark to achieve documentation.
Finally, add a new script function of Execute Script with a script type of Powershell. The script to execute will be the delivered payload to the test on the VM, while all other settings can remain the defaults. Note, this is an Automate Powershell function, which will be different than the Powershell function below.
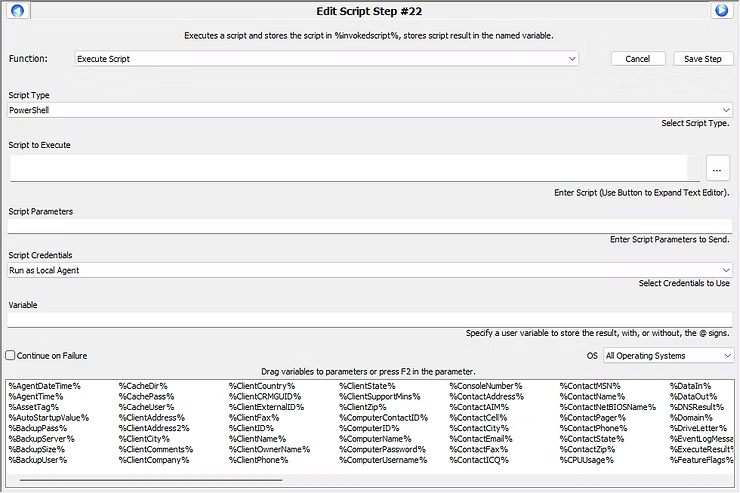
While delivery of the payload is achievable in various methodologies, depending on the script logic in implementation, the one highlighted in this writing will be a Powershell function detailed below added to the Script to Execute payload. Note, this Powershell function is native to Powershell, which is outside of Automate.
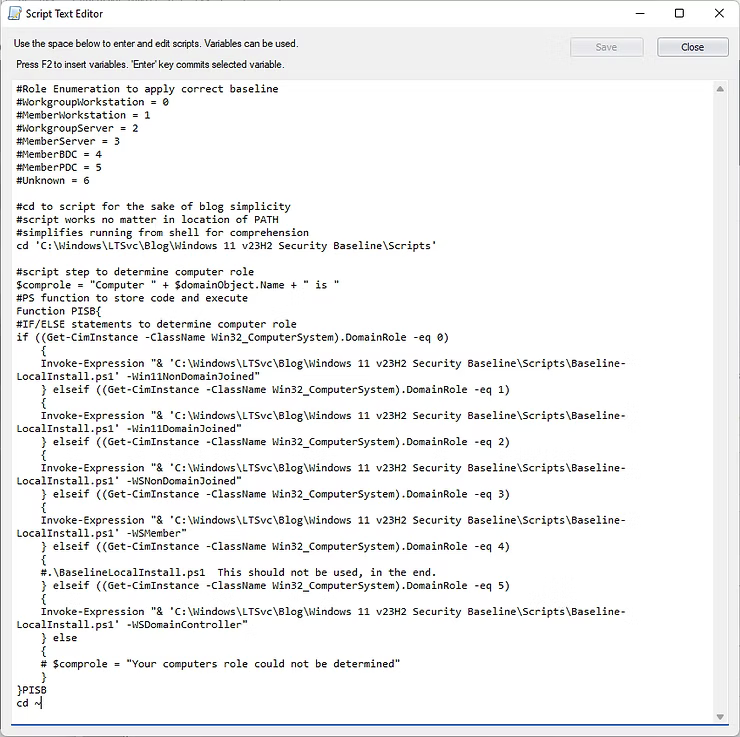
#WorkgroupWorkstation = 0

#MemberWorkstation = 1

#WorkgroupServer = 2

#MemberServer = 3

#MemberBDC = 4

#MemberPDC = 5

#Unknown = 6

#cd to script for the sake of blog simplicity

#script works no matter in location of PATH

#simplifies running from shell for comprehension

cd 'C:\Windows\LTSvc\Blog\Windows 11 v23H2 Security Baseline\Scripts'

#script step to determine computer role

$comprole = "Computer " + $domainObject.Name + " is "

#PS function to store code and execute

Function PISB{

#IF/ELSE statements to determine computer role

if ((Get-CimInstance -ClassName Win32_ComputerSystem).DomainRole -eq 0)

    {

    Invoke-Expression "& 'C:\Windows\LTSvc\Blog\Windows 11 v23H2 Security Baseline\Scripts\Baseline-LocalInstall.ps1' -Win11NonDomainJoined"

    } elseif ((Get-CimInstance -ClassName Win32_ComputerSystem).DomainRole -eq 1)

    {

    Invoke-Expression "& 'C:\Windows\LTSvc\Blog\Windows 11 v23H2 Security Baseline\Scripts\Baseline-LocalInstall.ps1' -Win11DomainJoined"

    } elseif ((Get-CimInstance -ClassName Win32_ComputerSystem).DomainRole -eq 2)

    {

    Invoke-Expression "& 'C:\Windows\LTSvc\Blog\Windows 11 v23H2 Security Baseline\Scripts\Baseline-LocalInstall.ps1' -WSNonDomainJoined"

    } elseif ((Get-CimInstance -ClassName Win32_ComputerSystem).DomainRole -eq 3)

    {

    Invoke-Expression "& 'C:\Windows\LTSvc\Blog\Windows 11 v23H2 Security Baseline\Scripts\Baseline-LocalInstall.ps1' -WSMember"

    } elseif ((Get-CimInstance -ClassName Win32_ComputerSystem).DomainRole -eq 4)

    {

    #.\BaselineLocalInstall.ps1  This should not be used, in the end.

    } elseif ((Get-CimInstance -ClassName Win32_ComputerSystem).DomainRole -eq 5)

    {

    Invoke-Expression "& 'C:\Windows\LTSvc\Blog\Windows 11 v23H2 Security Baseline\Scripts\Baseline-LocalInstall.ps1' -WSDomainController"

    } else

    {

    # $comprole = "Your computers role could not be determined"

    }

}PISB

cd ~
Once defined the solution becomes more realized.
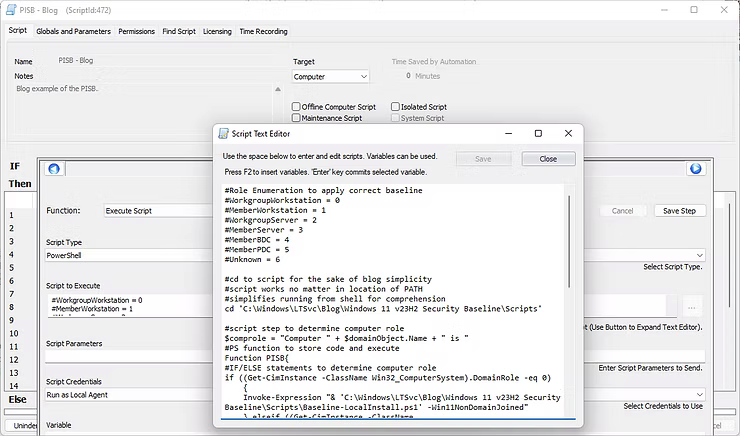
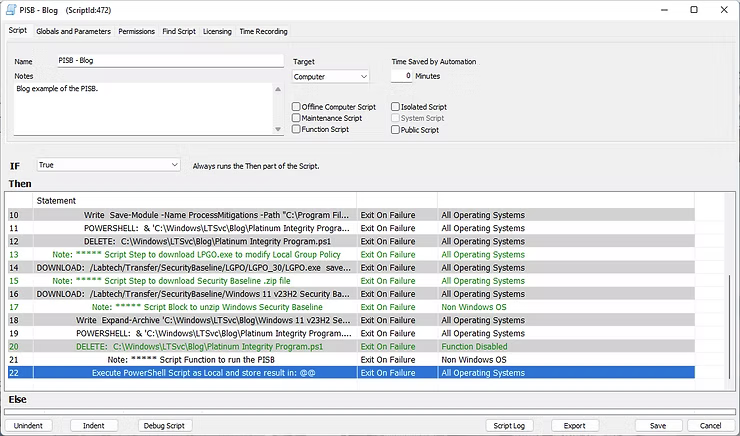
In the interest of consistency, and in case a COPY/PASTE error occured in the creation of this blog post, below is a screenshot from the Script Text Editor of the actual development of this process.
The cd, or Change Directory step, is to simplify the run and troubleshooting processes for the purposes of understanding. Technically, an inexperienced IT Professional could just copy/paste the above script as long as the Microsoft Security Compliance Toolkit baseline is in the C:\Windows\LTSvc\Blog\Windows 11 v23H2 Security Baseline\Scripts directory. Such a test would result in the below screenshot where various settings from the Microsoft Security Compliance Toolkit are applied.
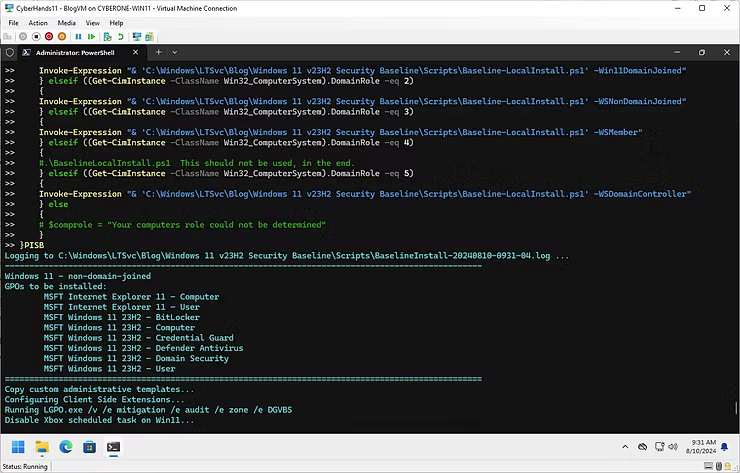
As can be observed, to further verify the veracity of the script, peruse the BaselineInstall-date.log file to observe the script option of Windows 11 - non-domain-joined, GPOs applied, Client Side Extensions, and Security Templates indicating a successful implementation.

However, the purpose of this series is to apply the Microsoft Security Compliance Toolkit through ConnectWise Automate, not to stage the files and then run the script manually.
In the interest of testing the established work and theory, using the Revert option to roll the VM back to a state before any work began will allow further testing from a clean slate.
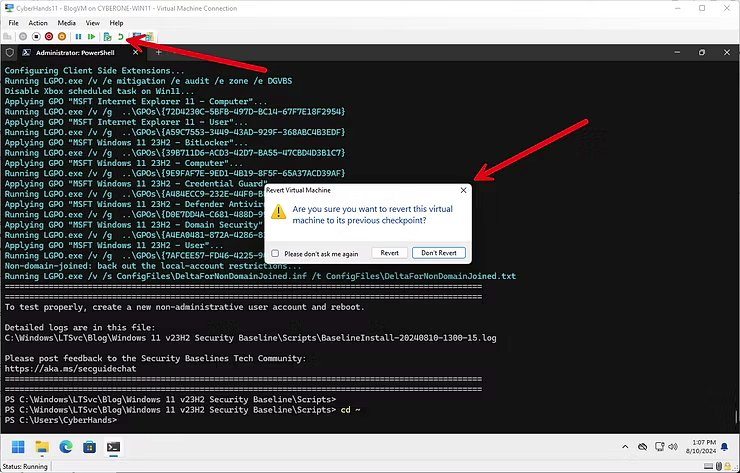
Once restored, logging in to the Windows 11 can confirm the LTSvc is at a default state.

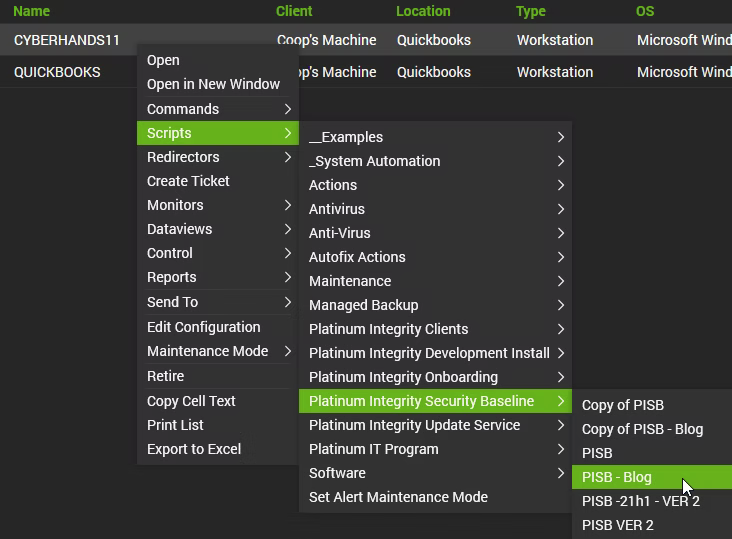
Allowing the script to be run once the script is saved.
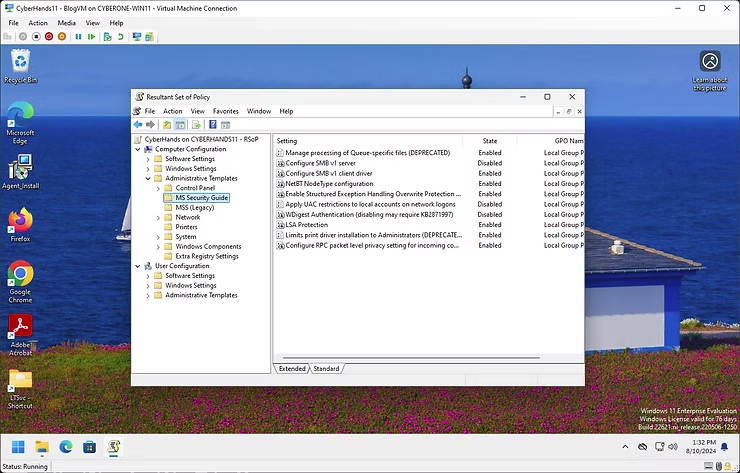
While ConnectWise Automate applies the Microsoft Security Compliance Toolkit in the background through the agent, the implementer can confirm success up to this point by running a RSOP.msc on the local machine to confirm the applied Local Group Policy Objects.
While Administrators use the Client/Server model methodology, Cloud Methodology, or some type of centralized methodology in deploying out cybersecurity settings, the argument in favor of this methodology is an enhancement of the cybersecurity of the local host machine, whether Windows 10/11 or a Windows Server, which will result in an enhanced security posture of the local machine.
The purpose of these blog posts is to provide a Defense in Depth local level layer of a Windows Workstation or Server security baseline in case that link or communication to the Client/Server model methodology, Cloud methodology, or some type of centralized methodology is broken, compromised, or disrupted to further slow down a Threat Actor.
Now that a baseline is established, further options will follow in future blogs highlighting how modifying the Microsoft Security Compliance Toolkit scripts will enable an applicable solution for Windows Servers.